Dienstag, 26. April 2016

Best of 3D - Part 1


Once in a while, you make a discovery that blows you away. I had this recently when I discovered that I could turn many of my macro photos into 3D images (!). The series that I shot often had slightly moved positions giving exactly the left and right eye information that is needed for 3D vision. This is a selection of the moist stunning results so far, - more to come -. You need a red/cyan glasses which comes with almost any 3d print medium. Maybe you still have one? (Those from back in the eighties also work!)


If not, you can simply take a piece of transparent plastic (product packaging, CD case) and a red and green permanent marker and color two fields. Make sure that you hold the red part for your left eye! It is far from perfect but should should you give something between boring flat and "wow-3d".

                                Romanesco broccoli

                                Clouds

                                Bolete, probably porcino

 
                                Muskroot (Adoxa moschatellina) 

                                Tinder fungus

                                Slime mould 

                                Slime mould close-up

Montag, 18. April 2016

Flying to other solar systems


Flying to other solar systems, would that ever be possible?! Last week, a web-publication appeared in which scientists have came up with a way to do this and formulated 20 challenges in design and material science to make it possible:
http://www.breakthroughinitiatives.org/Challenges/3
If you now think of large spaceships, you are wrong. It concerns so called nanocrafts; little computer chips with a camera, battery and communication device that have a large (4m x 4m) sail to catch laser beams from earth (for initial energy and communication). The advantage of these nanocrafts is that they are so lightweight that they may reach velocities as fast as 1/5 of the light speed! This means that the closest star at 4 light years away could be reached in 20 years. Of course this is optimistic. But wouldn't it be wonderful to reach several of our neighbor solar systems (List_of_nearest_stars_and_brown_dwarfs) within 50 to 100 years?
Some see it as the unavoidable step to discover 'new earths' just in time before ours becomes uninhabitable. Columbus discovered America because Europe was so dirty, overfished and deforested that it was an urgent to find new resources and clean places to start over again. I think, curiosity is still the best motivation to explore and discover and should create new opportunities beside -and not instead of- existing ones (Europe is now more clean, forested and sustainable than 200-500 years ago!).

This example from breakthroughinitiatives nicely illustrates how you set goals in science; by dreaming, extrapolating and definition of realistic small steps!

Freitag, 15. April 2016

Origami butterfly

An elegant and simple model that I designed and diagrammed back in 2002 (or so): Origami Butterfly by JE. Sorting out my designs made me clear that there is enough to diagram and share, from jungle animals and plants to flying seeds that really fly. Well, maybe one day...

At least I can share this one with you.

Feel free to distribute! 

Two math questions for bikers: with interesting solutions!


1. When you are biking and you stop for 1 minute to put on a coat and your bike partner goes on, how long will it take before you keep up, by going 2 km/h faster? After what distance do you meet again?
Solution (simplified, ignoring the acceleration phase):
Between begin of stop and re-unite person 1 and person 2 have traveled the same distance (D). During the stop phase (Tstop) person 2 has continued to cycle with velocity 2 (V2). After the stop phase, person 1 has to gain with velocity 1 (V1) the distance that person 2 has cycled during the stop phase. The time required (T) to keep up is hence given by:
T = Tstop*V2 / V2-V1
and the distance:
D = V1*T
So say that the velocity of person 2 is 20 km/h and that of person 2 is 22 km/h to keep up. Tstop is one minute, 1/60 hour. If you use the formula you find that the time needed to keep up is 10 minutes and the distance 3.7 km.
Of course, numbers increase when the base velocity of the trip (and hence person 2) is higher or the time stopped is longer. Every second counts! Better you stop both :-)

2. When you are bicycling in the rain, would it help to go faster?
You are earlier at your endpoint by reducing the total time in the rain, but you also get wetter because you get more raindrops per time unit. By biking faster, do you get wetter, are you getting less wet, or doesn't it matter at all? Does the same apply for walking and motorcycling?
Rain is usually measured as rate in mm/h. After making some calculations on a sketch paper I found out that this problem is independent of surface and distance! The rain rate is normally applied to a non-moving object. The rain "receive rate" depends on the velocity of the object, not on it's surface. An object that moves twice as fast as another, receives twice as much rain per time unit. The rain rate can just be multiplied by the velocity to get the rain receive rate. If you then multiply the rain receive rate with the time required for a fixed distance, you will find that two objects moving with different speeds have received the same amount of rain at the end of the track. So when you are going faster, you are only faster to get dry clothes in a warm house! But if you know the rain is going to stop before you get home, slow down!

Feel free to comment if you have any addition or correction!

Donnerstag, 7. April 2016

360° Panaroma of the Stünz Park in Leipzig

My first post on this blog. So many ideas and almost finished mini-projects. Would the first post be my microscope images of bees and beetles, an R-script, a how-to, my anaglyph 3d photos, or ... ? No. My first post is about a 360 degree panorama that I uploaded to 360cities. It was something I wanted to do for a long time.


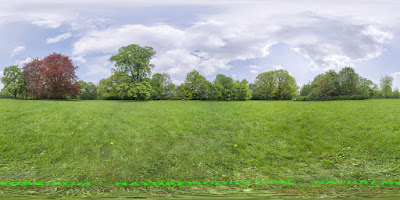
It is a set of 48 images that I took in 2010 in the Stünz Park in Leipzig, and thanks to the excellent stitching engine of Lightroom, and my new computer could combine these photos, finally!
You can walk through this panorama in full screen ("toggle full screen", left from shopping cart) and rotate left, right, up and down and zoom in to see full detail. Now, try to count the dandelions and daisies..., enjoy! The arrows have been put in by 360cities and link to other panoramas (better not click on them if you want to stay in the panorama).

This is how I made this 360 degree panorama:
I took 48 photos on a tripod with a 18 mm lens that overlap enough (portrait orientation). Covering 360 degrees with much fewer images is only possible with a wider lens (<18mm) such as a fisheye lens. The photos were stitched together in Lightroom, which worked better than with Photoshop or Hugin, although top and bottom were not complete (because clouds had been moving and I worked without a nodal point adapter). I made some color and contrast adjustments and exported the equirectangular image of this panorama.


These are the rough steps that I took in Photoshop for this final version:
* cut the picture in two parts at a vertical line where the new outer border should come, and switch these parts. The previous outer border is now more central, and you can now see what should be a seamless border does not come perfectly out of Lightroom. The geometric fit is good, but you need to correct differences in color and brightness (burn/dodge/clone).
* extend canvas size at the top and bottom region so that the side ratio is exactly 2:1. If the image is 2000 pixels wide and 980 high, it needs 10 pixels at top and bottom more.
* now get rid of incomplete top and bottom. One way is to stretch (layer from background,edit->transform->scale) to top and bottom so that all bad part are gone. A better way is this nice free (32 bit) plugin super cubic:
http://www.superrune.com/tools/supercubic.php
It converts the equirectangular projection to 6 cube faces, or as we need the top and bottom face. You can now use the spot healing brush to complete the clouds and remove the tripod. See the site for instructions how to use and convert back to equirectangular. In this step I also added my site "naturemoods.com".
* After some final adjustments, including sharpening, it is ready to upload at 360cities.com!

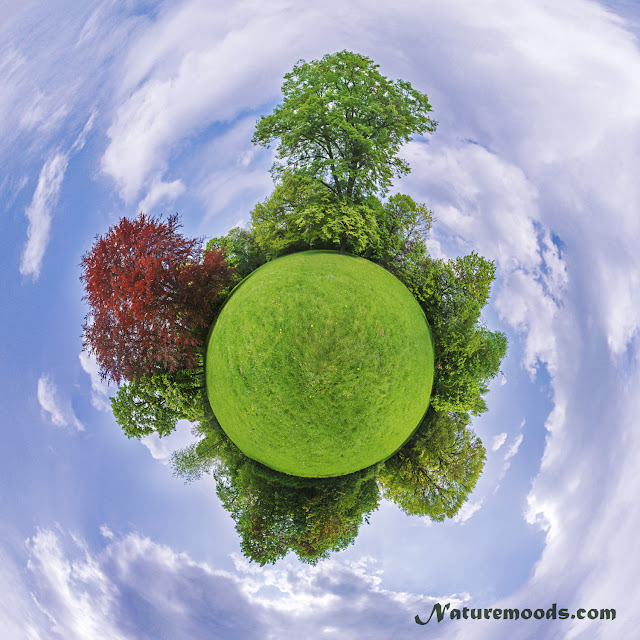
But it is also nice to make a "little planet" from the equirectangular image.


This is how:
- use canvas size to make the image square, 1:1
- move the image to the bottom
- use filter -> distort -> spherize, vertical only. This makes the sky longer, and the bottom shorter.
- stretch (edit->transform->scale) make it fill the square
- rotate 180 degrees
- use filter -> distort -> polar coordinates, to make the planet
- with filter -> lens correction you can make the center look smaller. You can apply it several times.
- with filter -> liquify - to make own distortions toward the edges. In my case, I pulled at the top of the big tree to make it look like a normal tree again.
- rote and crop, ready!

Update 2020 - another Panorama
In Autumn 2019 several older trees got damaged and were removed from the park. Apart from the panorama in 2010, I also tried one in 2013 with a cheap ultra wide angle lens (58mm 0.45X Weitwinkel Objektiv Konverter Makro for 35€). This was the first and the last time I used this lens; vignetting was terrible and lens sharpness was only in the center acceptable and colors and contrast were horrible. But it was a wonderful day, with spring flowers everywhere, and as I realized my attempt was a time document with the older trees still standing strong. I therefore did a more rigorous editing and cutting in Lighroom and PS, to get rid of as much 'bad' as possible. In PS I manually edited the clipping masks of each layer to get the most sharp areas. I didn't believe in this for a long time, but result is acceptable.


One additional challenge to overcome was the horizon that was not straight. Photoshop seems to have problems correcting this, but you can easily straighten your panorama with the free software Hugin:
- add image (only one)
- lens type is equirectangular
- go to the panorama preview - press the button straighten
- left click to move/set center
- right click (left or right from center) to change angle from center - straightens horizon
to export from Hugin: go to advanced/expert mode, go directly to Stitcher and export. Do not forget to 'calculate optimal size' for the original dimensions.
You can now further edit in PS, e.g. to edit top and bottom. The free plugin by superrune I proposed earlier is 32 bit, and does not work in 64 bit PS. I considered buying their 64bit plugin for 35$, but I decided to get for a bit more the Flexify 2 plugin from Flaming Pear, which can do 'Nadir and Zenit' editing and incredibly much more projections, from mini planets to origami globes.