
When you like handcrafts and are fascinated by the earth and space, you probably imagine whether you could make a high quility globe out of cardboard, or even a lamp. The answer is yes, and you can do it even for free. Here I explain how. Some parts may seem difficult, but I encourage to try it.
You can find a lot of free high quaility images on the web to start with, e.g.
https://www.solarsystemscope.com/textures/
https://astrogeology.usgs.gov/maps/
(look on the list of the right side of the page for sub-pages, like: https://astrogeology.usgs.gov/maps/io-voyager-galileo-global-mosaics and https://astrogeology.usgs.gov/maps/planetary-maps-and-globes)
The maps are all in the so-called equirectangular projection, which is the basis for making globes.

1. Making a Rhombicuboctahedron
A rhombicuboctahedron is a good representation of a sphere that is also manageable in terms of cutting and gluing.
The original posts and files by Philippe Hurbain are found here:
https://www.reddit.com/r/RicohTheta/comments/4o4e7h/instructions_for_printing_360_degree_panoramas/
https://www.philohome.com/rhombicuboctahedron/rhombicuboctahedron.htm
Basically you need the program Hugin and templates to change the projection and the GIMP (or similar) to put the generated pieces together. Download the templates from the link above and follow the instructions.
You can also use my completed sheets directly (pdf here) for printing the moon on paper. Either use thick paper (120g or more), or as in the photo above on transparent paper to make a moon-lamp.
2. Make slices and glue them on an existing sphere
Another way is to make 'orange peels', which you can glue on a sphere, e.g. of wood or Styrofoam.
I prefer not less than 12 and not more than 24 peels or so-called 'gores' as a good balance between nice shape and amount of work (cutting).
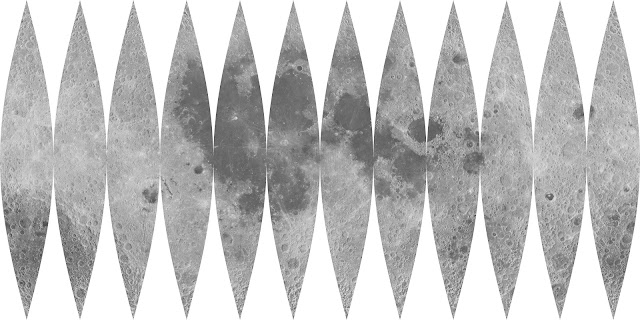
Start with an equirectangular image. Save it in the format *.ppm. You can do this with Irfanview or The Gimp (or Photoshop). Now it gets a bit more complicated, because you need to run a perl script. Do do so, you need to install a Perl interpreter first, e.g. Strawberry Perl.
The Perl script by Mitchell Charity you can find here:
http://www.vendian.org/mncharity/dir3/planet_globes/
The site also provides a plugin for the Gimp, but on larger images you rund into problems, therefore I suggest to download the make_gores.pl script (rename the *.txt to *.pl).
Tips on installing perl:
http://learnperl.scratchcomputing.com/install/
There are different ways of working with command line scripts. I prefer to do it as follows. I work in the folder where my (ppm) image is. Make sure you also have the make_gores.pl
(Usage: make_gores.pl in.ppm out.ppm number-of-gores) file here.
There I create a new textfile, open it and type the line
make_gores.pl test.ppm test-out.ppm 12
Save the textfile, and then rename the textfile from *.txt to *.bat
When you now double-click on the *.bat file, it executes the line you typed.
Now you can open and edit the new ppm file and save it to the desired format (tiff, jpg).
The last step is the most tricky. You have a sphere with a certain diameter, and you need to fit the paper to it. The 'gores' must fit your sphere exactly, with shapes that aren't real spheres. With cut-out gores, pulling the paper to the poles, fits the paper tight, so the image height must be exactly half of the circumference of the sphere. This is the easy part. Determining the image width is more difficult. When you bend the different gores along the equator, you cannot stretch the paper so tight. Seen from above, you have regular shape with 12 or 24 equal points and sides. The circumference is longer than that of the sphere, since the sphere exactly fits into it. For the known diameter and radius of you sphere you can calculate how wide your image needs to be.

When you have 12 gores it is as follows. The outer 2D shape is a dodecagon (12-sided polygon), consisting of 12 isosceles triangles if you like, with a circle fitting to the inner side, touching the middle of the standing base side of each triangle. This means you know the height of the triangle, which is the circle radius. The top angle of the triangle is 30° (360/12). To calculate the base, you use textbook geometry. Split your isosceles triangles in two right triangle with angles 90°-15°-75°. The half of the original base is: tan(15°)*r. The circumference of the shape is than 12*2 as much.
This comes to an approximate increase of 2.35 % in length (i.e. the length is 1.0235*circle circumference for 12 gores).
My first attempt (100% width) was clearly too short. My last attempt, with this calculation resulted in a slight overlap. Therefore, next time I would try to increase the length a little bit less, say 1.5-2.0%. Also it probably makes a different whethet you cut each gore apart (good fit) or keep them together in the middle (tighter fit possible).
3. Use an affordable Photoshop plugin
There are simpler ways to re-map equirectangular images to make paper globes. My favorite, is the Photoshop plugin Flexify 2 from Flaming Pear. The price is acceptable and it saves so much time compared to the methods above, that is was worth a try for me. It has so many options, that you can almost endlessly play with different projections. You can e.g. make the 12 gores in parts of 4, so you can print them on 3 pages. Most models come with gluing-strips as well.
4. Some of my other mapping projects
A. Pluto
This dwarf planet was visited by a spacecraft in 2015 - an extraordinary achievement with many new insights - yielded high quality images for a part of the surface.
I decided to combine different attempts of the global map and fill in empty space, to make a globe for home-use possible.
I used a detailed image as basis:
https://astrogeology.usgs.gov/search/map/Pluto/NewHorizons/Pluto_NewHorizons_Global_Mosaic_300m_Jul2017
For the extra part and color, I used
https://photojournal.jpl.nasa.gov/catalog/PIA11707
I filled the missing parts with a rotated copy of the upper part and modified tones and softness combined with content aware fill. This means that this version of Pluto is not completely realistic, but optimized for printing.


B. Asteroid Bennu
One of the most recent Nasa projects completed with success:
youtube.com/watch?v=QunVAWABQSc
Image source:
https://www.nasa.gov/content/osiris-rex-images
The asteroid Bennu has a shape between a sphere and an octahedron. I played around with projections. I found the octahedron not nice enough, and decided to make a 6 gore projection and alter this a bit. The result is a nice shape that can be printed on thicker paper.

When you have cut it, fold the lines before you glue it together:


Keine Kommentare:
Kommentar veröffentlichen