Posts mit dem Label Software how-to werden angezeigt. Alle Posts anzeigen

Mittwoch, 27. September 2023

Exposure stacking of a moonlit landscape - a challenge in Photoshop


You may have tried this yourself, trying to photograph a nice landscape with the moon during the twilight hours in the evening or morning. For a landscape like this you need a tripod and a long exposure time. The moon being many times brighter needs a very short exposure time. In cases with such brightness differences you normally make an exposure series as shown here (with tripod!) and use high dynamic range techniques and exposure stacking which is nowadays quite straightforward to use. However with the moon and a bright planet (Mars, or Venus) below the moon this does not work for several reasons:

  • The long exposure gives 'stripes' for the stars, planets and the moon as well, because the earth moves
  • Even more problematic for the same reason is that the moon, stars and palnet change position across the image between exposures
  • The exposure difference is too extreme. Even stacking the cropped moon alone with over 10 images does not yield a nice image

As I will explain here, there is a 'dirty' solution to this problem, which is not as realistic as exposure stacking, but gives a result that is quite true to the experience of the viewer. In short: the washed out moon needs to be cleaned (and not as bright), as well as planets and stars visible as stripes. From the end of the exposure series you copy in a layer and set it to blend mode 'lighten'.

Sonntag, 20. Dezember 2020

Photoshop filters for noise, color and sharpness

Free and commercial solutions compared for scanned negative film

The challenge
 
I have scanned a series of old negatives with my Epson Perfection V600 Photo. Even when the scans are of high quality, the scans have a few problems, which are
A. Film grain
B. Poor color
C. Focus problems
Now I like to compare free and commercial solutions to see whether the money could be worth the investment in terms of time saving and unparalleled results.

Samstag, 5. Dezember 2020

Handcrafting globes - with free software

DIY moon lamp

When you like handcrafts and are fascinated by the earth and space, you probably imagine whether you could make a high quility globe out of cardboard, or even a lamp. The answer is yes, and you can do it even for free. Here I explain how. Some parts may seem difficult, but I encourage to try it.

Sonntag, 13. November 2016

Macro photography in millimeter range: microscope vs DSLR camera

In this small review I compare two imaging methods, the VHX2000 microscope and a Canon EOS 7D camera with a reverse ring, for an object of a few mm in size.


This motive, a 30 million year old ant trapped in Baltic amber, is about 3 by 4 mm. Wit a normal macro lens or extension tubes, it is not possible to get such a small object so detailed captured. Reversing a wide angle (zoom) lens with an adapter (reverse ring or retro adapter) gives high magnifications and it is possible to get a good picture (right two images). I also had the opportunity to use a microscope with camera, the VHX2000 from Keyence, which is specially built for imaging small objects. I found that both are not perfect solutions, which makes a comparison meaningful.

Before I get to the differences, some words on what they have in common. Both work with lenses and a digital sensor. The depth of field is very limited and both require a stack of 10-20 images from bottom to top that are either merged in a stacking program like CombineZP or Photoshop*. They both disappoint in image quality and detail for printing on a A3 format. For more detail you need to zoom in and make a mosaic composite**. The ant image is based on a single stack image.

VHX2000 DSLR
Stability
Stable platform present Need to stabilize camera and object carefully
Image Quality
1600 x 1200 (3200 x 2400) pixel resolution 5184 x 3456 pixel resolution
Compressed/filtered data Raw data
Crisp sharpness difficult Crisp sharpness difficult
Details such as hairs visible Details such as hairs visible
Photo stacks by software Photo stacks manually
Optimal stacking


Non-optimal stacking
(movement of camera possible when turning wheel)
Light
Artificial light Natural and artificial light possible
Light from all sides (adjustable) Light from one side (with natural light)
Light can work 'flat' Lighting very flexible in giving depth
Clipping of light areas Fewer clipping areas (with Raw data)
Other
Zoom under 1 mm possible Zoom limited (here to about 2 mm objects)
Relatively fast Time consuming
Expensive Not expensive, when camera and lens are already in possession

Conclusion:
The pictures with either a VHX2000 or a reverse ring are slightly different, especially concerning color. The reverse ring method is more complicated and time consuming but gives an image quality that can keep up with a microscope image (apart from small lens distortions that are not considered here). For the price and quality, a reverse ring is a very attractive alternative to a microscope, when the object is not smaller than about 2 mm.

* On digital stacking:
1) CombineZP (freeware for stacking) gives nice results with the pyramid weighted average method. The idea is that the software reconstructs the 3d depth of the object. From the bottom layer, the sharpest is considered and build up to the top layer with complex algorithms.
2) Photoshop can also yield nice results with a different method. It just keeps the most sharp part from each layer. Sometimes the result is nicer than CombineZP, sometimes not. To do this, choose File => Scripts => Load files into stack. In the layer palette, select all layers. Then choose: Edit => Auto-Align Layers, followed by Edit => Auto-Blend Layers. Sometimes the result is better without Auto-Align (eventually manual align).

** Mosaic composite:
E.g. a mosaic of 6 image columns by 6 image rows with overlap in area for stitching gives at most 3 times more detail. With 20 stack layers per image, you need to manage 36x20=720 images (which I only did once). First you stack each mosaic part with the favored software, after which the mosaic is stitched together. This is time consuming because it often requires manual adjustments, and is only justified when an image is indeed to be presented at A3 format.

Mittwoch, 12. Oktober 2016

Free desktop backgrounds


A small present from Naturemoods.com, a package of backgrounds for you computer in the formats 1920x1080, 1280x800, 1366x768 and 1024x768. Download HERE.


A smaller fit can be elegant, supply a better overview of your icons and save energy with a black background.

How to use (Windows 10):
- Open the downloaded zip
- Copy the folder Backgrounds1 to "Pictures" (This PC)
- Go to your desktop and right-click on an empty spot, and choose "Personalize"
- Here you can set Background to "Picture".
- Important: Set "Choose a fit" to "Center" first! (Backgrounds are not made to stretch, span, etc.!)
- Click on "Browse" to choose you picture. Navigate to the folder Backgrounds1 in Pictures where you have put it.
- Now you can try different backgrounds to find out what your favorite is, in the size of your desktop. You can choose one that fits your background, but you can also choose a smaller one (as above in the example) when you wish.
- If you are done and still in the settings window, you see a list on the left. "Background" first and "Lock screen" as third. Go there, and select a picture here as well. You can also set "Show lock screen background picture on the sign-in screen" to ON.

Donnerstag, 7. April 2016

360° Panaroma of the Stünz Park in Leipzig

My first post on this blog. So many ideas and almost finished mini-projects. Would the first post be my microscope images of bees and beetles, an R-script, a how-to, my anaglyph 3d photos, or ... ? No. My first post is about a 360 degree panorama that I uploaded to 360cities. It was something I wanted to do for a long time.


It is a set of 48 images that I took in 2010 in the Stünz Park in Leipzig, and thanks to the excellent stitching engine of Lightroom, and my new computer could combine these photos, finally!
You can walk through this panorama in full screen ("toggle full screen", left from shopping cart) and rotate left, right, up and down and zoom in to see full detail. Now, try to count the dandelions and daisies..., enjoy! The arrows have been put in by 360cities and link to other panoramas (better not click on them if you want to stay in the panorama).

This is how I made this 360 degree panorama:
I took 48 photos on a tripod with a 18 mm lens that overlap enough (portrait orientation). Covering 360 degrees with much fewer images is only possible with a wider lens (<18mm) such as a fisheye lens. The photos were stitched together in Lightroom, which worked better than with Photoshop or Hugin, although top and bottom were not complete (because clouds had been moving and I worked without a nodal point adapter). I made some color and contrast adjustments and exported the equirectangular image of this panorama.
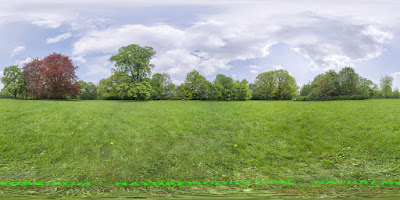
 

These are the rough steps that I took in Photoshop for this final version:
* cut the picture in two parts at a vertical line where the new outer border should come, and switch these parts. The previous outer border is now more central, and you can now see what should be a seamless border does not come perfectly out of Lightroom. The geometric fit is good, but you need to correct differences in color and brightness (burn/dodge/clone).
* extend canvas size at the top and bottom region so that the side ratio is exactly 2:1. If the image is 2000 pixels wide and 980 high, it needs 10 pixels at top and bottom more.
* now get rid of incomplete top and bottom. One way is to stretch (layer from background,edit->transform->scale) to top and bottom so that all bad part are gone. A better way is this nice free (32 bit) plugin super cubic:
http://www.superrune.com/tools/supercubic.php
It converts the equirectangular projection to 6 cube faces, or as we need the top and bottom face. You can now use the spot healing brush to complete the clouds and remove the tripod. See the site for instructions how to use and convert back to equirectangular. In this step I also added my site "naturemoods.com".
* After some final adjustments, including sharpening, it is ready to upload at 360cities.com!

But it is also nice to make a "little planet" from the equirectangular image.
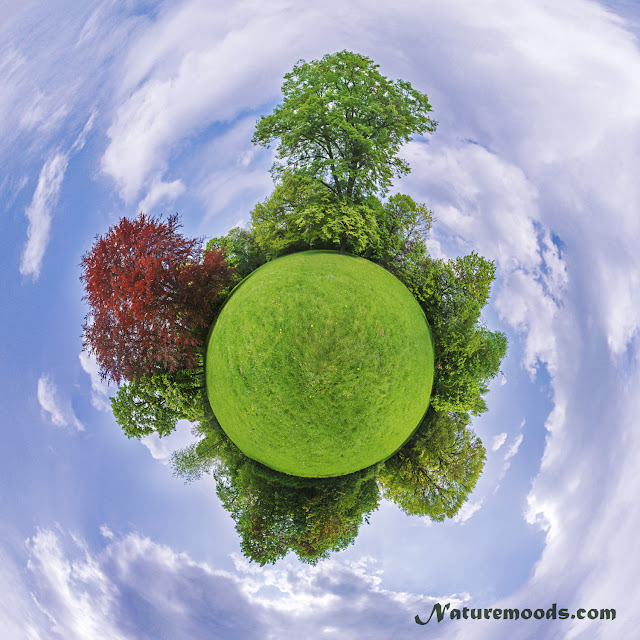


This is how:
- use canvas size to make the image square, 1:1
- move the image to the bottom
- use filter -> distort -> spherize, vertical only. This makes the sky longer, and the bottom shorter.
- stretch (edit->transform->scale) make it fill the square
- rotate 180 degrees
- use filter -> distort -> polar coordinates, to make the planet
- with filter -> lens correction you can make the center look smaller. You can apply it several times.
- with filter -> liquify - to make own distortions toward the edges. In my case, I pulled at the top of the big tree to make it look like a normal tree again.
- rote and crop, ready!

Update 2020 - another Panorama
In Autumn 2019 several older trees got damaged and were removed from the park. Apart from the panorama in 2010, I also tried one in 2013 with a cheap ultra wide angle lens (58mm 0.45X Weitwinkel Objektiv Konverter Makro for 35€). This was the first and the last time I used this lens; vignetting was terrible and lens sharpness was only in the center acceptable and colors and contrast were horrible. But it was a wonderful day, with spring flowers everywhere, and as I realized my attempt was a time document with the older trees still standing strong. I therefore did a more rigorous editing and cutting in Lighroom and PS, to get rid of as much 'bad' as possible. In PS I manually edited the clipping masks of each layer to get the most sharp areas. I didn't believe in this for a long time, but result is acceptable.


One additional challenge to overcome was the horizon that was not straight. Photoshop seems to have problems correcting this, but you can easily straighten your panorama with the free software Hugin:
- add image (only one)
- lens type is equirectangular
- go to the panorama preview - press the button straighten
- left click to move/set center
- right click (left or right from center) to change angle from center - straightens horizon
to export from Hugin: go to advanced/expert mode, go directly to Stitcher and export. Do not forget to 'calculate optimal size' for the original dimensions.
You can now further edit in PS, e.g. to edit top and bottom. The free plugin by superrune I proposed earlier is 32 bit, and does not work in 64 bit PS. I considered buying their 64bit plugin for 35$, but I decided to get for a bit more the Flexify 2 plugin from Flaming Pear, which can do 'Nadir and Zenit' editing and incredibly much more projections, from mini planets to origami globes.